
|
Granny's Daughter for CharityDirections for assembling motifs |
We get so many requests for how we assemble our motifs, I decided that it was time to post them. Please remember that these are only ideas, not absolutes. The desired finished item will dictate which assembly method will produce the desired results.
No matter what assembly method is used, or what item is being made, the first step is to join the motifs into strips. The number of motifs in a stripwill depend upon the item being made, the weight of the yarn used in the motifs & in joining the motifs, and the guage achieved by the crocheter.
Need the pattern for Granny's Daughters Motif
1st joining row
DO NOT turn work - ch 1 and sc in same stitch as sl st, ch 3, 3 sc in ch 3 space, ch 3, skip 2 sc and sc in the scjoin, *. Repeat from * to * until you are at the last ch 3 space, ch 3, 3 sc in ch 3 space, ch 3, skip 2 sc and sc in next sc (this will be the center sc of the 5 sc in the strip corner.) ch 1 and turn strip so that the wrong side of the strip is now facing you.
2nd joining row
Pick up 1st strip, right side facing and place on top of the just completed strip. You will now be working first on the facing strip, then on the just completed strip, back and forth, joining the two strips together.
Sc in the center sc of the 5 corner sc's on the facing strip, * ch 1, sl in the back ridge of the second ch on the 2nd strip which has the back facing you (NOTE: the back ridge of a chain is illustrated in many leaflets and other books, if you are having trouble doing the slst in the back ridge, just work a regualr slst in the center st of the 3st ch), ch 1, 3 sc in the ch 3 space of the facing strip, ch 1, sl st in the back ridge of the 2nd ch on the 2nd strip, ch 1, sc in the scj of the facing strip*.
Repeat from * to * until you reach the end of the strip. Ch 1, sl st in the back ridge of the 2nd ch on the 2nd strip, ch 1, 3 sc in ch 3 space of front strip, ch 1, sl st in the back ridge of the 2nd ch on the 2nd strip, ch 1, sc in center sc of the 5 sc corner of facing strip, ch 1, sl st in first sc of first joining row on the back strip. End and cut yarn
Continue adding new strips until the desired size is reached.
Continue adding new strips until the desired size is reached.
Rather than sl st in the back loop of every sc on both strips, sl st in back loop of sc on BOTH strips, ch 1, skip next sc. Continue down the strips using the ch 1, sl st, omitting the final ch 1, if necessary, so the sl st comes through the back loop of 3rd sc of the corner 5 sc on BOTH loops. Cut and finish off yarn.
Continue adding new strips until the desired size is reached.
One row of dc all around the edge with 5 dc at each corner
Three rows of sc around the edges with 3 sc worked in each corner. This looks really nice when a contrasting color is worked on the second round.
Simple shell - work one (or more) rows of sc around the edge, 3 sc in each corner. Final round of the border work simple shell as follows - 3dc skip one sc, 1sc, skip one sc, around working a 5 dc shell in each corner. (NOTE: you may have to skip a stitch or two near the corner to get the 5 dc shell in the right stitch.)
Bigger shell - work one (or more) rows of sc around the edge, 3 sc in each corner. Final round of the border work bigger shell as follows - *5dc skip four sc* repeat between *'s around working a 5 dc shell in each corner. (NOTE: you may have to skip a stitch or two near the corner to get the 5 dc shell in the right stitch.) Yet another shell - work one (or more) rows of sc around the edge, 3 sc in each corner. Final round of the border work shell as follows - sc-dc-sc in first sc, skip one sc, around working a sc-3dc-sc shell in each corner. (NOTE: you may have to skip a stitch or two near the corner to get the sc-3dc-sc shell in the right stitch.)
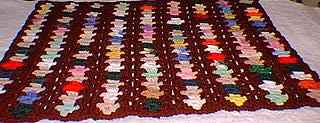 Afghans
Use worsted weight yarn in desired color and a size G or H hook. Join 20 motifs in each strip and use 12 strips per afghan using the Basic Join pattern. Complete with desired border.
It is not necessary to use all one color in your afghan. Different colors can be used for strips thus creating a very colorful afghan.
Use worsted weight yarn in desired color and a size G or H hook. Join 8 motifs in each strip and use 6 strips per afghan using either the Single Crochet Close Join pattern (using the Joining Variation) or the Double Crochet Join pattern. Complete with desired border.
Preemie aftghans can also be made using motifs and joining yarn from both baby/fingering weight and sports weight. Simple use the guidelines below for the hook size and number of motifs to use and follow the directions above.
Preemie Afghan with Sports Weight Yarn - Hook size E or F, required number motifs: 70
10 motifs per row - 7 rows total
Preemie Afghan with Baby/Fingering Weight Yarn - Hook size C or D, required number motifs: 108
12 motifs per row - 9 rows total
Use worsted weight yarn in desired color and a size G or H hook. Join 40 motifs in each strip and use 18 strips per afghan using the Basic Join,Single Crochet Close Join, or the Double Crochet Join pattern. Complete with desired border.
It is not necessary to use all one color in your afghan. Different colors can be used for strips thus creating a very colorful afghan.
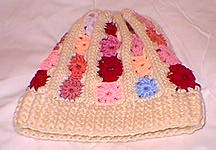 Hats
Hats
Basic Hat - Small, Required numbered motifs: 36
Basic Hat - Large, Required numbered motifs: 44
Use worsted weight yarn in desired color and a size G or H hook. Join 4 motifs in each strip and use 9 strips for size small, 11 strips for size large per hat using the Single Crochet Close Join.
After joining the required number of strips, join the first strip to the final strip creating a tube. DO NOT cut yarn. Completed the top of the hat as follows:
Working around the ends of the strips at the top of the tube - do not join rounds but work continuously. Ch 1, then work sc dec (see Special Stitches) around until 4 to 6 stiches remain. Finish off and cut yarn leaving a long tail. Thread yarn needle and run through remaining stitches to close top. Pull yarn tight and finish off securely on the wrong side.
Work hat ribbing around the end of the strips of the tube as follows:
Round 1: Join with a sl st in any stitch and ch 3 (counts as first dc). Dc in each stitch around. Join with sl st to the 3rd chain of the first ch 3.
Round 2: Ch 2 (counts as first pdc). *Work fpdc around next dc, bpdc around next dc* (see Special Stitches for directions for fpdc and bpdc). Repeat between *'s around joining with a sl st to the 2nd ch of initial ch 2. Note: don't worry about whether the round ends with a fpdc or a bpdc, either one will look fine in the finished hat.
Rounds 3 - 6: Ch 2. *Work fpdc around fpdc of previous row, work bpdc around bpdc of previous row.* Repeat between *'s around joining with a sl st to the 2nd ch of initial ch 2.
Cut yarn and finish off. Add pom-pom or tassel if desired.
Curls - optional hat topping, great for Happy Hats.
To make the curls, ch 27, 4 dc in the 4th ch from the hook, 5 dc in each of the remaining chains. I then use the starting and ending yarn pieces of the curl to tie the curl onto the top of the hat, then I sew the two ends in to make sure that the curl is really secure. I make 3 curls to put on the top of a hat, though you could do 4 if you wished.